Materials
Pushpins
Brown yarn or string
A piece of wood to use as a thimble
Instructions
1. Make the Outline: Begin by putting pushpins into
the wall in the general shape of the tree you'd like to create. Using a
piece of wood as a "thimble" will spare your fingers from blisters and
from becoming numb. Kathryn begins with a photo of a tree printed out to
give her the basic guide as to the shape she's going for.
A few tips from Kathryn on designing your tree:
Don't be too symmetrical or regular with the branches, trees are not ladders.
Generally odd numbers of things look better than even.
Don't try to make it too perfect. Trees grow kind of wonky.
Don't be too linear. Jump around with the string.
2. Begin to Wrap the String: Using a brown yarn, begin
to wrap the string around the push pins. Start with the trunk and then
do each brand individually. Kathryn advises not to be too linear—jump
around with the string and double back to give more texture or the
appearance of bark. Feel free to use the same pin many times. 3. Add Character: To make knotholes, make a ring or
two of pushpins and wrap the string in a circle while weaving in and
out. Vary the size of branches and the spacing between them. Let
branches overlap. 4. Starting and Stopping: To take a break, simply tack the string firmly into place with a pushpin and wind it around a few times to maintain tension.
Now that my university is closed for winter holidays, I finally have more free time to do all the crafty things I’ve been wanting to. One of these is a lamp made from plastic cups I’ve seen at taf, the art foundation, in the Monastiraki region in the center of Athens.
When I first saw it at taf, I was amazed; I looked closely and I couldn’t believe my eyes! The object itself is so peculiar, modern and alien-like it could be in any design exhibition. With my best friend’s birthday coming up, I decided to make it myself and give it to her as a gift. It turns out it was the easiest craft I’ve even done, the epitome of DIY objects!
Disclaimer: There have been some concerns about the safety of this construction (see the comment of user “when” below for example). We only use this lamp when we’re at home, so we have it under surveillance. It doesn’t get hot or smelly. However, in case you like the idea and you decide to do it yourself, you do so at your own risk. It’s just a DIY project that we wanted to share, we can obviously not provide any safety guarantees.
I only needed a couple of things:
200-250 large plastic cups (recyclable, at least )
600-700 staples
a stapler
a lamp socket, lamp cord and plug – mine came from a broken IKEA lamp!
That’s all you will need.
Start stapling the cups together as shown.
Staple again and again and again…
Until your lamp goes from this…
…to this!
Staple carefully the last cups to form the top of the sphere (if it’s a sphere, because it’s likely that it won’t be that round if some cups aren’t perfectly aligned). Leave the bottom part open so that the light bulb goes in the sphere and attach it any way you like to the lamp socket! My IKEA socket had a kind of base and some very convenient holes on it (as you can see at the first picture), so I just stapled green ribbons at the last row of cups and tied them on the base.
The alien lamp is ready!
Update:
Sam (see comments below) made a very nice table top version of the lamp, check it out here! Update 2:
This picture of the whole lamp is for Eva (see comments below).
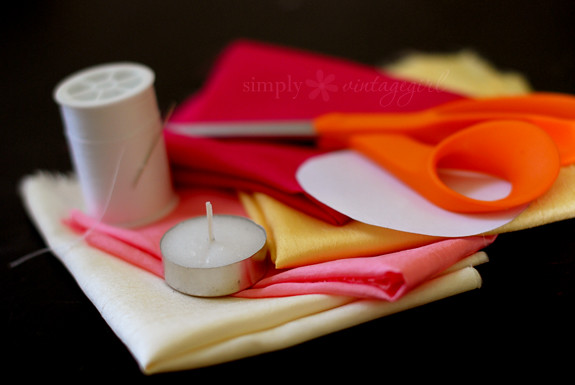
These elegant fabric flowers are very simple to make . . . and only take a few basic supplies. The finished product is delightfully lovely, and at times can look like a real flower! Every flower will turn out differently and that is part of the beauty!
If you haven’t used those tea lights in a while, now’s the time! I hope you enjoy making these as much as we do . . . below are instructions with pictures on how to make your own. Supplies:
· Needle and Thread, Glue Dots or Glue Gun
· Buttons and/or Beads
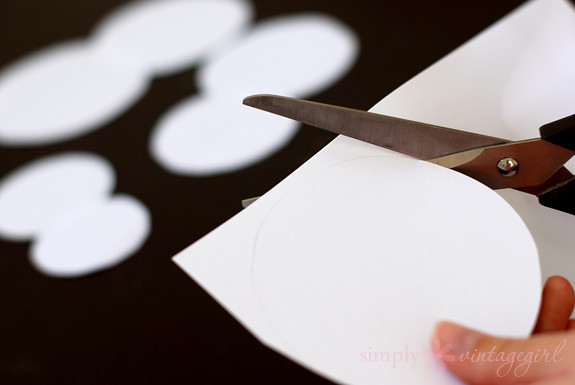
Directions: 1. Cut circle patterns out of card stock.
Make the largest one’s diameter about half an inch larger than you want the diameter of the flower, as the petals will end up shrinking a bit. Create a few of these, lessening the diameter bit by bit so that the end result has smaller petals in the center and larger ones around the outside. You can also use a pattern here, which works very nice!
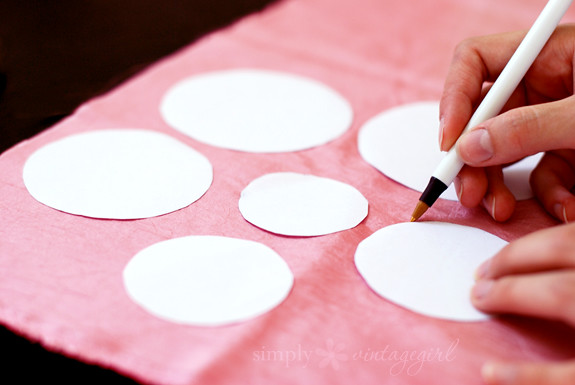
2. Trace around the pattern onto the silk fabric (using a pen).
You can also cut around the pattern and skip the drawing part, it just might not be as uniform . . . but with these, uniform isn’t necessary. And if it’s not uniform, it adds character. And character is good.
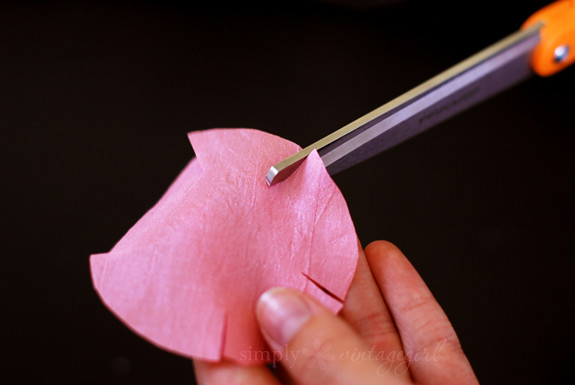
3. Take the scissors and cut out the circle and petals.
Cut just inside the drawn lines to make a circle out of the fabric. Carefully cut only about a third of the way into the circles to create the petals. You can do as many or few petals as you would like, or even add some variety to them. I cut five times, making five medium-sized petals. You can also round the corners of the petals, if you so desire.
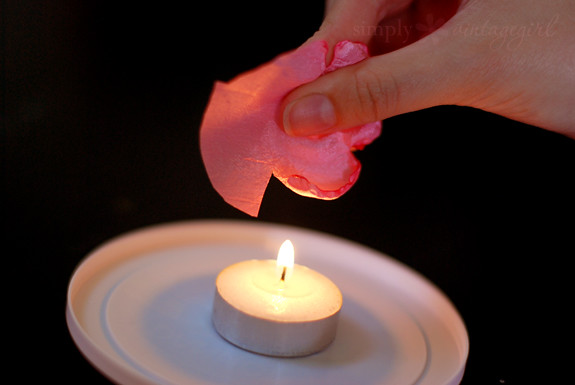
4. Use the lit candle to melt and crinkle the edges.
Be very careful (please have adult supervision, this is rather dangerous), as it is very easy to get burnt. Hold the cut petals about one to two inches above the flame, making sure to keep the circle rotating so that it does not overheat and catch fire. Continue to gently melt the edges of each petal until you have gone all the way around. Do this with each layer.
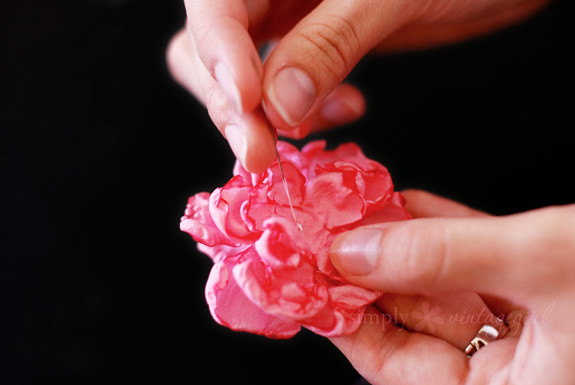
5. Sew (or glue) the petal layers together.
Using a needle and thread, create a beginning knot and then sew the layers together. You can come up through the top because the center of the top layer can be covered by a button or bead. To finish the flower, sew (or glue) the button or bead on top.
If you would like to add extra stability to the flower, you can sew or glue a piece of felt onto the back (make sure it is large enough to give good stability, but small enough so that it won’t be seen from the top).
For a hair accessory, you can sew or glue the back of the flower to the back of a bobby pin, ponytail holder, or snap-clip. For a broach, you can sew or glue them onto a broach pin or even a safety pin.
And the list could go on of how these flowers can add extra beauty! What are some of your ideas?
And remember: every flower will turn out differently and that is part of the beauty!
Here is a project I thoroughly enjoyed. With a combination of several different items that are easy to come by, you can come up with a wonderfully attractive little notebook to flip through. Supplies:
• Tabbed Index Cards – used ten 4″x6″ sized cards
• Scrapbook Paper – for extra beauty
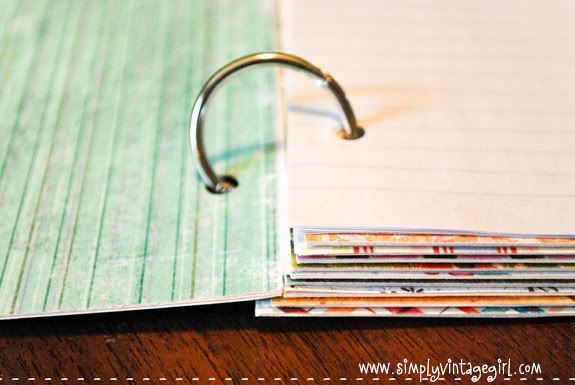
• Two Metal Rings – to bind notebook together
• Tape – double-stick tape or adhesive squares
• Pen – for writing section name on tabs
• Memo Book - one of the dirt cheap ones (same size as index cards – 4″x6″)
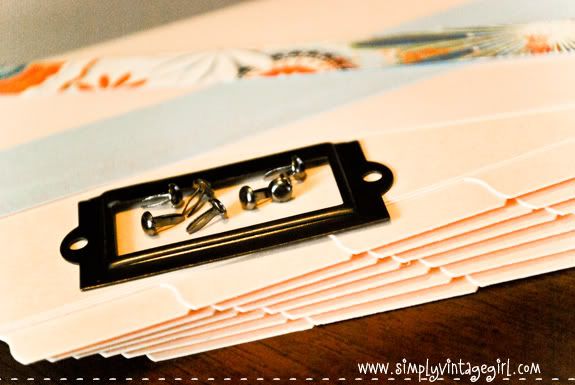
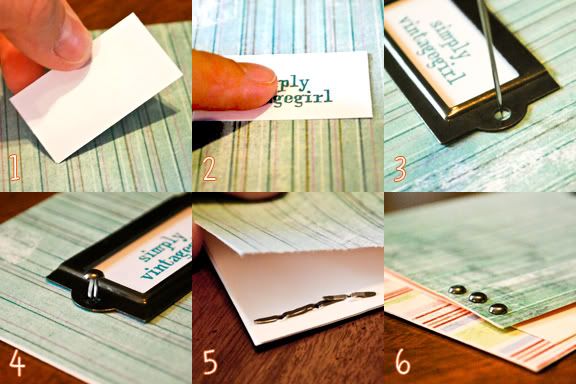
• Brads(optional) – for tacking down small frame
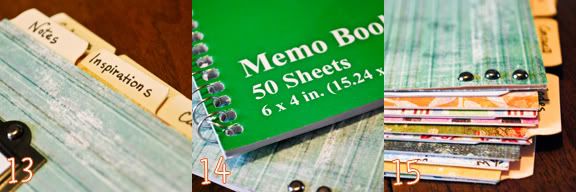
• Metal Frame(optional) – found in scrapbooking department, preferably a small size Directions: 1. Cut out scrapbook paper to fit the front of index card. Take cut-out (to fit metal frame, if desired) printed notebook label and stick to the front with adhesive. 2. Press to make sure it stays. 3. Place metal frame on top of label, and poke holes with a needle or other sharp object (please be very careful). 4. Stick brads through holes to secure frame. 5. Fold back the ends of the brads to make sure they stay put. 6. I added three extra brads to the bottom of the cover of my notebook. 7. For each divider index card, you can leave some blank without any decoration, 8. or you can go ahead and stick scrapbook paper down on each one, and even front and back if you wish. 9. Each of the pages and index cards will need to have holes punched in them so that they can be bound with metal rings. Since all three of us ladies (Mom, Bre and I) were making one, it made it easier to make a template and use it on each of the pages that needed punched. The template was a piece of card stock paper cut out the size of the index cards. Then holes were punched 1.5″ from the edge on both top and bottom (making two holes). In this way, all we had to do was lay the template on the paper, and with a pen or pencil draw a dot in the center of the hole that had been punched out of the template. 10. Take paper with mark from template, and center the dot in the hole punch. Punch hole. 11. Continue to do this with each page, and when you are finished they should all line up just right, with the holes in the exact same place on each page. 12. Unhook metal rings and poke through holes. 13. Label each section on the tab that sticks out from cards. 14. Rip the paper out of the memo book, and cut of the ripply, bumpy edge. Use the hole punch template to punch holes through lined paper in the right spots. 15. Unhook the metal ring and add the lined paper. This will give thickness and room to write in the notebook.
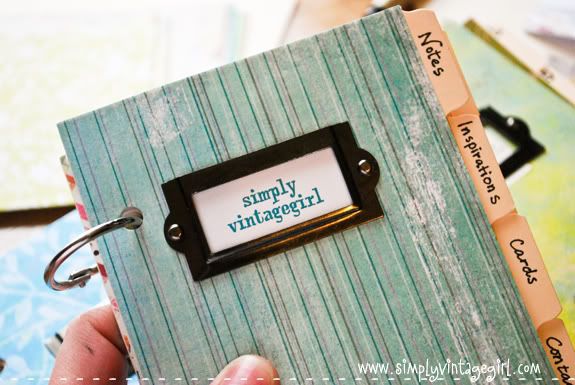
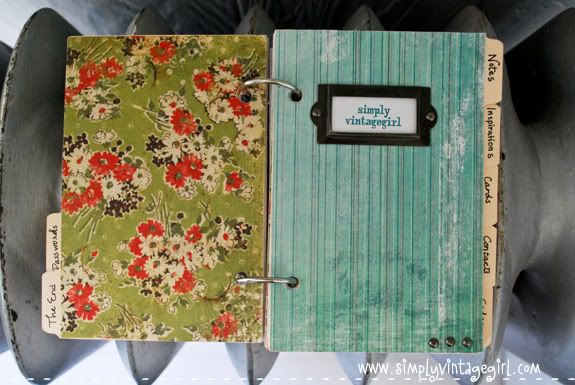
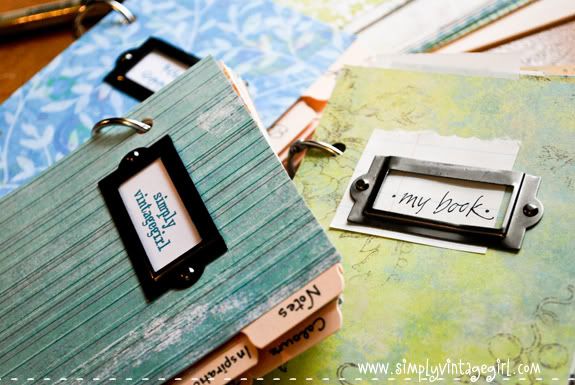
This is of the back and front covers of my little notebook. The tab on the back cover says, The End.
On the covers, I scrapbooked on both the front and the back side of the index card. In each section there are seven sheets of memo paper.
Momma’s is farthest away – Robin’s Egg Blue. Breezy’s is titled – My Book. And as you’ve probably noticed, mine is – simply vintagegirl.
Both Momma’s and Breezy’s tabs are alphabetically labeled, as in A, B, C, D, etc.
The tabs of my notebook are entitled: Notes, Inspirations, Cards, Contacts, Codes, Colours, Blogs, Photographs, Passwords, and The End. I am planning on adding a few more before “The End”, which will say: Scripture, Quotes, Recipes, Important Dates, and Post Ideas.
Hope you enjoy making your own little notebook!
How to Make Organic Oatmeal Bars of Soap
Organic oatmeal soap is easy to make right in your own kitchen.
Oatmeal soap is a gentle soap suitable for every type of skin. The oatmeal used in the soap also helps exfoliate the skin to remove dry flakes and give skin a healthy glow. You can purchase oatmeal soaps in stores, or you can whip up your own organic oatmeal soap at home. Making your own organic oatmeal soap ensures that you are using chemical-free, healthy ingredients that you select yourself. Plus, you can make up enough of your organic oatmeal soap to share with friends and family.
When
I bought something at a store recently, the clerk handed me my purchase
in a bag made from a newspaper. I liked it very much and had to make
some more—thus today's DIY recycled newspaper project: gift bags made
from the Wall Street Journal. You can vary the dimensions, of course,
but here's what I used to create a bag that's 5" tall, 4.5" wide, and 3"
deep.
Stack two sheets of newspaper on top of each other. This will be a two-ply bag for extra sturdiness.
Cut
out a rectangle that's 15.5" wide and 8.25" tall. If your paper already
has a fold in it, align the existing fold with one of the fold lines in
the diagram below, unless you don't mind an extra fold appearing
somewhere on your bag. I cut out this rectangle, then flipped the paper
over so the blue area would be on the outside of the bag.
Fold
a flap 1.25" down from the top. Fold a flap 2" up from the bottom. Then
measure off and make vertical folds in the places shown in the diagram
above. The front and back panels are 4.5" wide, the side gussets are 3"
wide, and you'll need a 0.5" flap for gluing the bag together.
Cut
two pieces of cardstock or chipboard to 4.25" x 1", then glue them on
the widest two panels just under the top fold. These will reinforce the
rim of the bag. Glue the top flap down along the length of the bag,
covering the cardstock. Since the bag is two-ply, you'll need to glue
both flap pieces down one at a time.
Put
glue on the outside of the 0.5" tab and bring the left-most panel over
to form the body of the bag, aligning the cut edge of the panel with the
folded edge of the flap. Add a little more glue to make sure the
outermost sheet of newsprint gets tacked down, too.
Upend
the bag so the 2" flap is now up. Fold the short sides inward as if you
were wrapping a present. If it seems easier, you could also lay the bag
on its side and crease those folds against the table.
Put
glue on both flaps and fold them inward to form the bottom of the bag.
Standing the bag upright and pressing down from the inside will help to
secure them.
Cut
a piece of chipboard to 4" x 2.5" and glue it to the bottom of the bag
to reinforce it and hide the flaps if you want to be an overachiever.
Punch holes in the rim of the bag, adding eyelets
if you like, and string some cord through the holes to form handles.
Knot each end of the cord so it won't pull out through the holes.
If you want to store your bag flat, pinch the top together, fold in the sides, and bring the bottom up so that it lies flat.
Jessica of Wednesday Inc
shows us how to make those gorgeous twine chandeliers from the
inspiration shoot she shared with us this morning. Using balloons, glue
and twine, you can also make these lanterns for your wedding – and then
bring it home and use it as your very own mid century lampshade.
What
you will need are: balloons, glue, yarn, tray for glue, corn starch 1/2
cup of Corn starch, 1/4 cup of Warm water, clear fast drying spray
paint, hanging lamp cord or fishing line (depending on your desired
final product), and a lighting kit if you’re looking for a fully
functional lantern. Jessica recommends using a sharpie to mark on the
inflated balloon how much room you need to leave for the lighting cord.
She also recommends coating the balloon with vaseline prior to wrapping
the yarn coated with glue so it doesn’t stick on the balloon once it’s
dry. You can see all the details on Jessica’s blog.
Are you getting excited to try to do this at home as much I am?
Instructions:
1. Inflate the balloon to a medium size so the shape is a little rounder.
2. If you’re looking to make a lampshade out of the string chandelier, use a sharpie to mark around the knot on the balloon.
3. Before you start working, we recommend using a tarp.Mix corn starch,
glue and warm water together until it has a smooth texture.
5.
Smear the vaseline all over your balloon until it is completely coated
so th twine wet with glue won’t stick on the balloon after dry.
6.
You can start a little assembly line with friends by one of you feeding
the yarn through the glue mix and giving to another person to wrap it
around the balloon.
7. Start wrapping the balloon vertically, slowly
changing to wrapping. For a seamless look, tuck the ends of the twine
under one of the wrapped strings.
8. Wait 24 hours until the balloon has completely dried before popping the balloon.
9. Spray the string chandeliers with clear fast drying spray paint et voila!
Glass Etching
Have you ever done anyglass etching?
Well, neither had I before today.
But wow. Such an easy, yet sweet little touch that you can add to any glass.
Check out my new and improved etched Trifle Bowl.
The perfect bowl for desserts of all kinds…..and even a great place for fresh fruit on the counter. And I kind of adore that little bird perched on the branch.
Glass etching is also a great way to stamp your name on your pyrex dishes, to make sure they come back to you.
And how about adding a little extra detail, just because……
Sweet in every way.
Are you wanting to make your own?
.
(This technique permanently etches your glass. You cannot remove it once you’re done. With that said, your creation will not rub or wash off, and will stay put as long as the dish lasts.)
First, you’ll need a piece of vinyl with an adhesive back, like the vinyl you buy for vinyl wall decor. You can buy rolls or sheets of it at craft stores (if you must have some today) or you can buy some great vinyl much cheaper from one of my sponsors, Expressions Vinyl. If you don’t have a craft cutter of some sort to cut the image for you (like I did), then you can trace an image, shape, or letters on the vinyl and then cut it out with an exacto knife, or utility knife. (And I haven’t tried this but I think you may be able to do the glass etching technique with a piece of contact paper, if you’re going to be cutting out your shapes free hand with an exacto knife.)
Then peel away the shapes, leaving the negative space all in one piece. (Keep in mind if you are using an exacto knife, to not cut through the negative space. Cut away the shapes/letters, but leave the main piece together, without cuts or tears in it.
The Silhouette code for the bird/branch is: bird_on_branch_C00044_23067 01/18/2010
Then place a piece of transfer paper (you could use contact paper for this too I’m guessing…) that is sticky on one side, to the front of your vinyl.
Then peel the vinyl backing away. (The red side that you see below is the sticky side.)
Then place your vinyl against your glass, making sure to center the image just where you’d like it. Press down firmly, then pull off the transfer paper/contact paper.
See how there are air bubbles? Press those down firmly with your fingers. If they are far from the opening of your image, don’t worry about them. You just don’t want the etching cream to get in under the edges and mess up the image.
Then apply a layer of your etching cream on the exposed glass. (I found this cream at Michael’s.) Follow the instructions on the bottle and allow the cream to sit and rough up the glass surface. (I left mine to sit for about 10 minutes.)
**Again, this process makes the etching permanent. The cream is an acid, and etches away at the surface of your glass…….transforming the look of your glass permanently. So you cannot rub or wash the etching off.
Then I rinsed off really well with water and used my fingers to rub it all off. Then I peeled back the vinyl and rinsed again with soap and water.
Dry your glass and admire the beautiful etching, all done for you by the cream.
Such a great technique, right?
And just think…….you could put together some pyrex dishes for a newly married couple, etched with their new last name. Then throw in some hot pads, cooking utensils, and your favorite recipes. Perfect gift.
Don’t forget, check back in tomorrow for a fabulous giveaway……eeeeh, I can hardly wait! (It may just have to do with how I was able to cut my vinyl for this project.)
stencil with freezer paper (harry potter tee)...
Yes, I am a nerd.
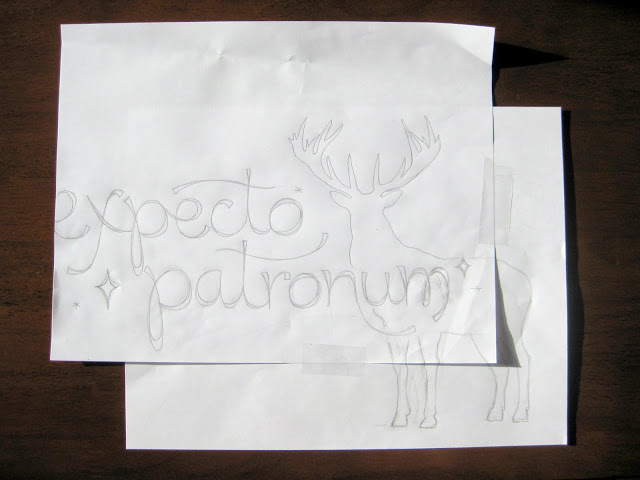
I came up with a brilliant idea for a Harry Potter t-shirt and I couldn't resist.
"Expecto Patronum!"
However, you can make whatever
kind of design you want with a freezer paper stencil. It doesn't have
to be Harry Potter related. (Although it would be awesome if it was.)
I learned about the joys of freezer paper back in my early college days.
{Turns out you learn all kinds of creative tricks in an art program. Who knew? :) }
Basically,
freezer paper is backed with a plastic coating that will stick to soft
surfaces when ironed, but it peels off cleanly and easily. So you can
draw whatever design you like on the paper side, cut it out, and then
stencil away on a t-shirt, tote, canvas, pillowcase, etc. You can find
it in the foil/plastic wrap aisle of your grocery store.
Start by drawing your design on some regular old paper.
My
design kept getting bigger, so I taped two sheets together. You are
going to transfer the design to freezer paper anyway, so don't worry
about erasing your mistakes. (If you aren't confident in your drawing
abilities, you can print something out and trace it. But make sure you
aren't ripping off someone else's work without permission. Be cool.)
Next, place your design underneath a sheet of freezer paper and trace it neatly with a sharpie.
The marker gives your lines greater width making it easier to cut them out and paint them in later.
Now place a piece of cardboard under your freezer paper to protect your
table while you cut. Start by cutting out any "inner" shapes.
Important: Set these shapes aside. DO NOT throw them away!
You have to iron them onto your shirt later in order to complete your stencil.
After reserving your inner shapes, cut out the rest of your design and
trim down the excess paper around the outside. (You can throw these
parts away.)
Iron the main body of your stencil onto your shirt.
Then add those little inner shapes to the correct places and iron them down.
Place a piece of cardboard between the layers of your shirt to prevent
the fabric paint from bleeding through. Use a stiff brush to apply your
fabric paint.
It may take a couple of coats to get good coverage.
Peel off your stencil while it's still wet, then allow your paint to dry
according to package directions. (And some fabric paints need to be
heat-set, so read the label!)
Once it's dry, you can wear your custom tee around town.
butterfly wall hanging tutorial...
I'm so excited to share my Butterfly Wall Hanging today!
I created this project as part of "All About Easter"...so welcome to all of you who popped over from Kiki Creates!
(And the rest of you should really check out the other posts if you
haven't already...all kinds of Easter goodness going on over there.)
Keeping
with the butterfly theme I've got going this year, I wanted to add
something bright and cheerful to my spring/Easter decor. And this
little beauty is so easy and inexpensive to make. To create one of your
own you'll need:
a photo frame
craft paint/paintbrush or spray paint
mod podge
butterfly images
an xacto knife
scissors or a paper cutter
a page from an old book
wire
wire cutters/pliers
hot glue
a marker
scrapbooking tape
I
actually had all of these things on hand, except for the frame which I
picked up at the dollar store. Doesn't get much cheaper than that!
Now you might be thinking, "She just happened to have some vintage butterfly illustrations on hand? Rii-iight."
Well, no. But I do have the internet and a color printer. Vintage Printables
is a sweet blog that has galleries of all kinds of vintage
illustrations available to the public domain. I'd recommend starting
there and printing butterflies in various sizes that fit your color
scheme.
Okay, so once you have your images printed and all of
your supplies gathered, start with the photo frame. Remove the backing
and glass--we won't be using those--then pull out the little metal bendy
things that hold the back on. (I don't know what those are called, but
hopefully you know what I'm talking about.)
Next, paint your frame the color of your choice.
I went with turquoise. (Shocking, I know.)
It was too crappy outside to spray paint, and I
wanted some of the original silver to show through... so I painted mine
kind of streaky, but you do yours however you want. (Or use a frame
that's already the color you want and skip this step altogether!)
While your paint dries, use an xacto knife to cut out your butterflies.
(I like to save the cardboard backs of notebooks and pads of paper to use as a cutting surface.)
Then, give your frame a top coat of mod podge to
prevent the craft paint from scratching or flaking off. (Skip this step
if you spray painted.)
While that dries, cut 2 lengths of wire to fit the dimensions of your frame.
(My frame is 8 x 10, so I cut my wire 10 inches long.)
Also decide what word you'd like to
use--spring, Easter, your last name, etc.--and cut out the appropriate
number of squares from your old book page. (I cut 6 squares that were
about 1.25 inches.) Use a marker to write each letter--or use a die cut
machine to cut out letters if you're not a fan of your own handwriting.
Once your frame is dry, attach your wires to the inside
lip of the frame with a dab of hot glue. (When placing your wires,
make sure to account for the size of your butterflies. You will
probably want to lay out your design first.)
See how one wire is much closer to the edge?
Had to leave room for my largest butterfly.
After your wires are attached, lay out your
whole project upside down. Use scrapbook tape to attach all of your
paper elements to the wires. The tape is sticky enough to hold all of
the pieces in place, but also allows you to slide things around a bit if
your spacing is off.
Lookin' good!
Now just tie a bit of ribbon to the top and hang her on the wall...
So bright and cheery!
I might have to change out my word to "summer" so I can keep it up longer.
(And wouldn't this also make a great decoration for a little girls room? With her name..or just all butterflies? Aww.)
INK RED BANGLE
Red
Prepare. All you'll need for this project is a raw wooden bangle (we got ours from DIYBangles.com), a black paint marker, plastic wrap, and some Inkodye! Transcribe. Write your message on a piece of plastic wrap big enough to wrap around your entire bangle. Perfect. Carefully practice wrapping it around your bangle to
see how it'll look. Once your satisfied with your message, you can put
the plastic wrap aside while you move onto the next step. It took us a
few times to get the penmanship right!
Pour. Take the Inkodye color of your choice and pour it onto a
plate or palet. You will need very little dye for this bangle, so don't
pour too much!
Brush. Cover the entire bangle with inkodye for a nice even shade. We also painted the inside to keep things easy. Wipe. Make sure to remove all excess Inkodye and keep wiping
until the bangle feels dry. This will prevent condensation inside the
saran wrap when you place the bangle in the sun. And don't worry about
wiping too much--the Inkodye has already been absorbed into the wood. Wrap. Take your plastic wrap and place your message wherever
you want! Once you're happy with the placement, pull the plastic wrap
taut by gathering it towards the back of your bangle.
Tape. Take the gathered saran wrap and twist it towards the middle. Tape in place. Expose. Bring your wrapped bangle out into the sun. The color will start to appear instantly! Develop. Leave the bangle out for four minutes on each side.
We recommend turning it front to back and flipping it upside down to
ensure all areas develop fully.
Cut. Once it's finished, bring the bangle inside and cut through the tape and saran wrap. Reveal. Peel back the saran wrap to reveal your dyed message! Once all the plastic is removed, it's ready to be washed.
Wash. We recommend preparing a very hot wash bath using dish
washing detergent as soap. Let the bangle soak for at least 20 minutes,
occasionally scrubbing the printed part with a brush or a sponge.
Enjoy. Flaunt your one-of-a-kind summer bangle and don't forget to carpe diem!

 Materials
 Now that my university is closed for winter holidays, I finally have more free time to do all the crafty things I’ve been wanting to. One of these is a lamp made from plastic cups I’ve seen at taf, the art foundation, in the Monastiraki region in the center of Athens.


 When
I bought something at a store recently, the clerk handed me my purchase
in a bag made from a newspaper. I liked it very much and had to make
some more—thus today's DIY recycled newspaper project: gift bags made
from the Wall Street Journal. You can vary the dimensions, of course,
but here's what I used to create a bag that's 5" tall, 4.5" wide, and 3"
deep.
When
I bought something at a store recently, the clerk handed me my purchase
in a bag made from a newspaper. I liked it very much and had to make
some more—thus today's DIY recycled newspaper project: gift bags made
from the Wall Street Journal. You can vary the dimensions, of course,
but here's what I used to create a bag that's 5" tall, 4.5" wide, and 3"
deep. Stack two sheets of newspaper on top of each other. This will be a two-ply bag for extra sturdiness.
 Fold
a flap 1.25" down from the top. Fold a flap 2" up from the bottom. Then
measure off and make vertical folds in the places shown in the diagram
above. The front and back panels are 4.5" wide, the side gussets are 3"
wide, and you'll need a 0.5" flap for gluing the bag together.
Fold
a flap 1.25" down from the top. Fold a flap 2" up from the bottom. Then
measure off and make vertical folds in the places shown in the diagram
above. The front and back panels are 4.5" wide, the side gussets are 3"
wide, and you'll need a 0.5" flap for gluing the bag together. Put
glue on the outside of the 0.5" tab and bring the left-most panel over
to form the body of the bag, aligning the cut edge of the panel with the
folded edge of the flap. Add a little more glue to make sure the
outermost sheet of newsprint gets tacked down, too.
Put
glue on the outside of the 0.5" tab and bring the left-most panel over
to form the body of the bag, aligning the cut edge of the panel with the
folded edge of the flap. Add a little more glue to make sure the
outermost sheet of newsprint gets tacked down, too. Upend
the bag so the 2" flap is now up. Fold the short sides inward as if you
were wrapping a present. If it seems easier, you could also lay the bag
on its side and crease those folds against the table.
Upend
the bag so the 2" flap is now up. Fold the short sides inward as if you
were wrapping a present. If it seems easier, you could also lay the bag
on its side and crease those folds against the table. Put
glue on both flaps and fold them inward to form the bottom of the bag.
Standing the bag upright and pressing down from the inside will help to
secure them.
Put
glue on both flaps and fold them inward to form the bottom of the bag.
Standing the bag upright and pressing down from the inside will help to
secure them. Cut
a piece of chipboard to 4" x 2.5" and glue it to the bottom of the bag
to reinforce it and hide the flaps if you want to be an overachiever.
Cut
a piece of chipboard to 4" x 2.5" and glue it to the bottom of the bag
to reinforce it and hide the flaps if you want to be an overachiever. Punch holes in the rim of the bag, adding eyelets
if you like, and string some cord through the holes to form handles.
Knot each end of the cord so it won't pull out through the holes.
Punch holes in the rim of the bag, adding eyelets
if you like, and string some cord through the holes to form handles.
Knot each end of the cord so it won't pull out through the holes. 


 )
)
 When
I bought something at a store recently, the clerk handed me my purchase
in a bag made from a newspaper. I liked it very much and had to make
some more—thus today's DIY recycled newspaper project: gift bags made
from the Wall Street Journal. You can vary the dimensions, of course,
but here's what I used to create a bag that's 5" tall, 4.5" wide, and 3"
deep.
When
I bought something at a store recently, the clerk handed me my purchase
in a bag made from a newspaper. I liked it very much and had to make
some more—thus today's DIY recycled newspaper project: gift bags made
from the Wall Street Journal. You can vary the dimensions, of course,
but here's what I used to create a bag that's 5" tall, 4.5" wide, and 3"
deep. Stack two sheets of newspaper on top of each other. This will be a two-ply bag for extra sturdiness.
 Fold
a flap 1.25" down from the top. Fold a flap 2" up from the bottom. Then
measure off and make vertical folds in the places shown in the diagram
above. The front and back panels are 4.5" wide, the side gussets are 3"
wide, and you'll need a 0.5" flap for gluing the bag together.
Fold
a flap 1.25" down from the top. Fold a flap 2" up from the bottom. Then
measure off and make vertical folds in the places shown in the diagram
above. The front and back panels are 4.5" wide, the side gussets are 3"
wide, and you'll need a 0.5" flap for gluing the bag together. Put
glue on the outside of the 0.5" tab and bring the left-most panel over
to form the body of the bag, aligning the cut edge of the panel with the
folded edge of the flap. Add a little more glue to make sure the
outermost sheet of newsprint gets tacked down, too.
Put
glue on the outside of the 0.5" tab and bring the left-most panel over
to form the body of the bag, aligning the cut edge of the panel with the
folded edge of the flap. Add a little more glue to make sure the
outermost sheet of newsprint gets tacked down, too. Upend
the bag so the 2" flap is now up. Fold the short sides inward as if you
were wrapping a present. If it seems easier, you could also lay the bag
on its side and crease those folds against the table.
Upend
the bag so the 2" flap is now up. Fold the short sides inward as if you
were wrapping a present. If it seems easier, you could also lay the bag
on its side and crease those folds against the table. Put
glue on both flaps and fold them inward to form the bottom of the bag.
Standing the bag upright and pressing down from the inside will help to
secure them.
Put
glue on both flaps and fold them inward to form the bottom of the bag.
Standing the bag upright and pressing down from the inside will help to
secure them. Cut
a piece of chipboard to 4" x 2.5" and glue it to the bottom of the bag
to reinforce it and hide the flaps if you want to be an overachiever.
Cut
a piece of chipboard to 4" x 2.5" and glue it to the bottom of the bag
to reinforce it and hide the flaps if you want to be an overachiever. Punch holes in the rim of the bag, adding eyelets
if you like, and string some cord through the holes to form handles.
Knot each end of the cord so it won't pull out through the holes.
Punch holes in the rim of the bag, adding eyelets
if you like, and string some cord through the holes to form handles.
Knot each end of the cord so it won't pull out through the holes. 


 My
design kept getting bigger, so I taped two sheets together. You are
going to transfer the design to freezer paper anyway, so don't worry
about erasing your mistakes. (If you aren't confident in your drawing
abilities, you can print something out and trace it. But make sure you
aren't ripping off someone else's work without permission. Be cool.)
My
design kept getting bigger, so I taped two sheets together. You are
going to transfer the design to freezer paper anyway, so don't worry
about erasing your mistakes. (If you aren't confident in your drawing
abilities, you can print something out and trace it. But make sure you
aren't ripping off someone else's work without permission. Be cool.) The marker gives your lines greater width making it easier to cut them out and paint them in later.
 You have to iron them onto your shirt later in order to complete your stencil.


No comments:
Post a Comment